

Signing Transactions
Learn how to sign transactions across multiple blockchains.
Chain signatures enable NEAR accounts, including smart contracts, to sign and execute transactions across many blockchain protocols.
This unlocks the next level of blockchain interoperability by giving ownership of diverse assets, cross-chain accounts, and data to a single NEAR account.
[accordion] Supported Networks
While you can sign transactions for any network using Eddsa or Ecdsa keys, each chain signs transactions differently.
Our example implementation shows you how to sign transactions for: Bitcoin, Solana, Cosmos, XRP, Aptos, Sui and EVM networks (Ethereum, Base, BNB Chain, Avalanche, Polygon, Arbitrum, and more).
Create a Chain Signature
There are five steps to create a Chain Signature:
- Deriving the Foreign Address - Derive the address that will be controlled on the target blockchain.
- Creating a Transaction - Create the transaction or message to be signed.
- Requesting a Signature - Call the NEAR MPC contract requesting it to sign the transaction.
- Formatting the Signature - Format the signature from the MPC contract and add it to the transaction.
- Relaying the Signed Transaction - Send the signed transaction to the destination chain for execution.
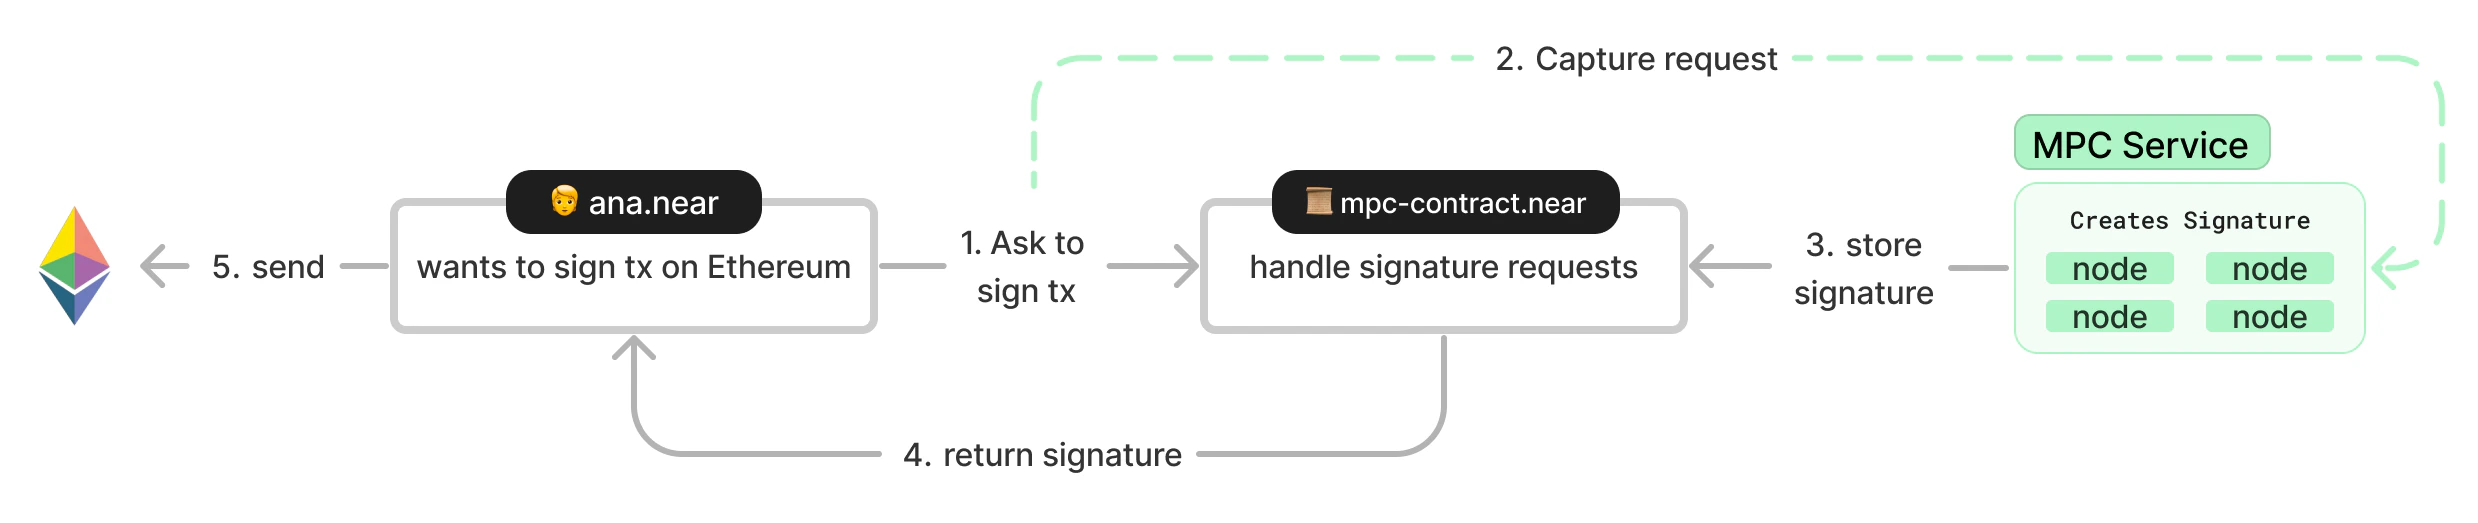
Diagram of a chain signature in NEAR
The chainsig.js library provides a convenient interface for completing each of these steps. The frontend uses @hot-labs/near-connect for wallet connections and transaction signing, and near-api-js for NEAR queries. Its NearProvider exposes the connected account and signAndSendTransactions through the local useNearWallet hook.
[!TIP]
For building transactions inside of NEAR smart contracts written in Rust, you can use the Omni Transaction library to easily build transactions for different blockchains (like Bitcoin and Ethereum).
[!NOTE]
MPC Contracts
There is an MPC contract available on both
mainnetandtestnet:
- Mainnet:
v1.signer- Testnet:
v1.signer-prod.testnetThe live participant set and threshold are in
v1.signer: see The MPC network today.
Chain Signatures Contract
To interact with the chain signatures library you first need to instantiate a ChainSignaturesContract.
export const SIGNET_CONTRACT = new contracts.ChainSignatureContract({
  networkId: NetworkId,
  contractId: MPC_CONTRACT,
});
The networkId and contractId are set to the values specified in the previous section depending which network you are on.
Chain Adapters
To interact with a specific chain, you need to instantiate the relevant chainAdapter.
[tab] Ξ EVM
const publicClient = useMemo(() => createPublicClient({ transport: http(rpcUrl), }), [rpcUrl]); const Evm = useMemo(() => new chainAdapters.evm.EVM({ publicClient, contract: SIGNET_CONTRACT, }), [publicClient]);The EVM chain adapter takes the
ChainSignaturesContractas an argument as well aspublicClientwhich is constructed from an EVM RPC URL.[!TIP]
To use different EVM networks, simply specify the RPC URL for your desired network. The example demonstrates compatibility with multiple EVM-compatible networks including Ethereum, Base, BNB Chain, Avalanche, Polygon, Arbitrum, zkSync, and many others. You can find RPC URLs for various networks at ChainList.
[tab] ₿ Bitcoin
const btcRpcAdapter = new chainAdapters.btc.BTCRpcAdapters.Mempool( "https://mempool.space/testnet4/api", ); const Bitcoin = new chainAdapters.btc.Bitcoin({ network: NetworkId, btcRpcAdapter, contract: SIGNET_CONTRACT, });The Bitcoin chain adapter takes the
ChainSignaturesContractas an argument as well as thenetwork("mainnet", "testnet" or "regtest") and abtcRpcAdapterwhich handles communication with the Bitcoin network.
[tab] ◎ Solana
const connection = new SolanaConnection("https://api.devnet.solana.com"); const Solana = new chainAdapters.solana.Solana({ solanaConnection: connection, contract: SIGNET_CONTRACT, });The Solana chain adapter takes the
ChainSignaturesContractas an argument as well as aconnectionwhich is constructed from a Solana RPC URL. If you want to use Mainnet, then you need to choose a Mainnet RPC.
[tab] ◉ XRP
const Xrp = new chainAdapters.xrp.XRP({ rpcUrl: "wss://s.altnet.rippletest.net:51233/", contract: SIGNET_CONTRACT, });The XRP chain adapter takes the
ChainSignaturesContractas an argument as well as anrpcUrlfor the XRP Ledger and therpcURlspecification. For testnet, usehttps://s.altnet.rippletest.net:51234.
[tab] ◈ SUI
const rpcUrl = getFullnodeUrl("testnet"); const suiClient = new SuiClient({ url: rpcUrl }); const Sui = new chainAdapters.sui.SUI({ client: suiClient, contract: SIGNET_CONTRACT, rpcUrl: rpcUrl, });The SUI chain adapter takes the
ChainSignaturesContractas an argument as well as aconnectionwhich is a SuiClient constructed from a SUI RPC URL.
[tab] ⬟ Aptos
const aptosClient = new AptosClient( new AptosConfig({ network: Network.TESTNET, }), ); const Aptos = new chainAdapters.aptos.Aptos({ client: aptosClient, contract: SIGNET_CONTRACT, });The Aptos chain adapter takes the
ChainSignaturesContractascontractand anAptosClientasclient. Configure the client with the Aptos network and node URL you want to use.
1. Deriving the Foreign Address
Chain Signatures use derivation paths to represent accounts on the target blockchain. The foreign address to be controlled can be deterministically derived from:
- The NEAR account calling the MPC contract (e.g.,
example.near,example.testnet, etc.) - A derivation path (a string such as
ethereum-1,ethereum-2, etc.) - The MPC service's master public key (we don't need to worry about this as it is defined in the library we're using).
To derive the address call the deriveAddressAndPublicKey method passing the near account Id from which the address is being derived and the derivation path.
[tab] Ξ EVM
const { address } = await Evm.deriveAddressAndPublicKey(signedAccountId, debouncedDerivationPath);
[tab] ₿ Bitcoin
const { address, publicKey } = await Bitcoin.deriveAddressAndPublicKey(
  signedAccountId,
  debouncedDerivationPath,
);
[tab] ◎ Solana
const { publicKey } = await Solana.deriveAddressAndPublicKey( signedAccountId, debouncedDerivationPath, );On Solana, your address is the same as your public key.
[tab] ◉ XRP
const { address, publicKey } = await Xrp.deriveAddressAndPublicKey(
  signedAccountId,
  debouncedDerivationPath,
);
[tab] ◈ SUI
const { address, publicKey } = await Sui.deriveAddressAndPublicKey(
  signedAccountId,
  debouncedDerivationPath,
);
[tab] ⬟ Aptos
const { address, publicKey } = await Aptos.deriveAddressAndPublicKey(
  signedAccountId,
  debouncedDerivationPath,
);
[!NOTE]
The same NEAR account and path will always produce the same address on the target blockchain.
example.near+ethereum-1=0x1b48b83a308ea4beb845db088180dc3389f8aa3bexample.near+ethereum-2=0x99c5d3025dc736541f2d97c3ef3c90de4d221315
2. Creating the Transaction
To construct the transaction to be signed use the method prepareTransactionForSigning.
[tab] Ξ EVM
Constructing a transaction to transfer ETH is very simple. The
valueis the amount of ETH in Wei as type BigInt (1 ETH = 1018 Wei).return await Evm.prepareTransactionForSigning({ from: senderAddress, to: receiverAddress, value: BigInt(Web3.utils.toWei(transferAmount, "ether")), });This method returns the
unsigned transactionand the transactionhash(es)(also known as thepayload).
[tab] ₿ Bitcoin
Constructing a transaction to transfer BTC is very simple. The
valueis the amount of BTC in satoshis as a string (1 BTC = 100,000,000 sats).const { transaction, hashesToSign } = await Bitcoin.prepareTransactionForSigning({ publicKey: senderPublicKey, from: senderAddress, to: receiverAddress, value: transferAmount.toString(), });This method returns the
unsigned transactionand the transactionhash(es)(also known as thepayload).
[tab] ◎ Solana
Constructing a transaction to transfer SOL is very simple. The
valueis the amount of SOL in lamports as type BigInt (1 SOL = 1,000,000,000 lamports).const { transaction: { transaction }, hashesToSign, } = await Solana.prepareTransactionForSigning({ from: senderAddress, to: receiverAddress, amount: decimalToBigInt(transferAmount, 9), });This method returns the
unsigned transactionandhashesToSign, the message bytes to pass to the signing contract.
[tab] ◉ XRP
Constructing a transaction to transfer XRP is straightforward. The
valueis the amount of XRP in drops as a string (1 XRP = 1,000,000 drops).const { transaction, hashesToSign } = await Xrp.prepareTransactionForSigning({ from: senderAddress, to: receiverAddress, amount: decimalToBigInt(transferAmount, 6).toString(), publicKey: senderPublicKey, });This method returns the
unsigned transactionand the transactionhash(also known as thepayload).
[tab] ◈ SUI
Constructing a transaction to transfer SUI is simple. The
valueis the amount of SUI in MIST as type BigInt (1 SUI = 1,000,000,000 MIST).const transactionSui = new Transaction(); const [coin] = transactionSui.splitCoins(transactionSui.gas, [ decimalToBigInt(transferAmount, 9), ]); transactionSui.transferObjects([coin], receiverAddress); transactionSui.setSender(senderAddress); const { hashesToSign, transaction } = await Sui.prepareTransactionForSigning(transactionSui);This method returns the
unsigned transactionand the transactionhash(also known as thepayload).
[tab] ⬟ Aptos
Constructing a transaction to transfer APT is straightforward. The
valueis the amount of APT in octas as type BigInt (1 APT = 100,000,000 octas).const transactionPayload = { function: "0x1::aptos_account::transfer", functionArguments: [receiverAddress, decimalToBigInt(transferAmount, 8)], }; const transaction = await aptosClient.transaction.build.simple({ sender: senderAddress, data: transactionPayload, }); const { hashesToSign } = await Aptos.prepareTransactionForSigning(transaction);This method returns the
unsigned transactionand the transactionhash(also known as thepayload).
[accordion] EVM Function Calls
To call a function on a smart contract we need the ABI of the contract, in our repo this is defined in the config.js file (this can be gathered from Remix or using Etherscan).
Then define a
Contractobject using theetherslibraryconst contract = useMemo(() => new Contract(contractAddress, ABI, new JsonRpcProvider(rpcUrl)), [contractAddress, rpcUrl]);Then to construct the transaction
const data = contract.interface.encodeFunctionData("set", [number]); return await Evm.prepareTransactionForSigning({ from: senderAddress, to: contractAddress, data, });This approach allows you to call smart contract functions by encoding the function data and including it in the transaction.
3. Requesting the Signature
Once the transaction is created and ready to be signed, a signature request is made by calling sign on the MPC smart contract.
The method requires four parameters:
- The
payloads(or hashes) to be signed for the target blockchain - The derivation
pathfor the account we want to use to sign the transaction - The
keyType,EcdsaforSecp256k1signatures andEddsaforEd25519signatures. - The
signerAccountwhich contains theaccountIdthat is signing and thesignAndSendTransactionsfunction from Near Connect.
[tab] Ξ EVM
const rsvSignatures = await SIGNET_CONTRACT.sign({
  payloads: hashesToSign,
  path: debouncedDerivationPath,
  keyType: "Ecdsa",
  signerAccount: {
    accountId: signedAccountId,
    signAndSendTransactions,
  },
});
[tab] ₿ Bitcoin
const rsvSignatures = await SIGNET_CONTRACT.sign({ payloads: hashesToSign, path: debouncedDerivationPath, keyType: "Ecdsa", signerAccount: { accountId: signedAccountId, signAndSendTransactions, }, });For Bitcoin, it is common to have multiple UTXOs to sign when sending a single transaction. We create a NEAR transaction (to call
signon the MPC contract) for each UTXO and send them to be signed by the MPC individually. Each signature is then parsed from each transaction outcome to produce an array of signatures.
[tab] ◎ Solana
Pass the
hashesToSignreturned bySolana.prepareTransactionForSigningdirectly toSIGNET_CONTRACT.sign. For Solana, the adapter supplies the serialized transaction message as a byte array for Ed25519 signing.const rsvSignatures = await SIGNET_CONTRACT.sign({ payloads: hashesToSign, path: debouncedDerivationPath, keyType: "Eddsa", signerAccount: { accountId: signedAccountId, signAndSendTransactions, }, });
[tab] ◉ XRP
const rsvSignatures = await SIGNET_CONTRACT.sign({ payloads: hashesToSign, path: debouncedDerivationPath, keyType: "Ecdsa", signerAccount: { accountId: signedAccountId, signAndSendTransactions, }, });
[tab] ◈ SUI
const rsvSignatures = await SIGNET_CONTRACT.sign({
  payloads: hashesToSign,
  path: debouncedDerivationPath,
  keyType: "Eddsa",
  signerAccount: {
    accountId: signedAccountId,
    signAndSendTransactions,
  },
});
[tab] ⬟ Aptos
const rsvSignatures = await SIGNET_CONTRACT.sign({
  payloads: hashesToSign,
  path: debouncedDerivationPath,
  keyType: "Eddsa",
  signerAccount: {
    accountId: signedAccountId,
    signAndSendTransactions,
  },
});
4. Formatting the Signature
Once the signature is returned from the MPC it needs to be formatted and added to the transaction to produce a signed transaction.
[tab] Ξ EVM
const finalizedTransaction = Evm.finalizeTransactionSigning({
  transaction,
  rsvSignatures,
});
[tab] ₿ Bitcoin
const finalizedTransaction = Bitcoin.finalizeTransactionSigning({ transaction, rsvSignatures, });For Bitcoin, the array of signatures is added to the transaction to produce a complete signed transaction.
[tab] ◎ Solana
const finalizedTransaction = Solana.finalizeTransactionSigning({
  transaction,
  rsvSignatures: rsvSignatures[0],
  senderAddress,
});
[tab] ◉ XRP
const finalizedTransaction = Xrp.finalizeTransactionSigning({
  transaction,
  rsvSignatures,
});
[tab] ◈ SUI
const finalizedTransaction = Sui.finalizeTransactionSigning({
  transaction,
  rsvSignatures: rsvSignatures[0],
  publicKey: senderPublicKey,
});
[tab] ⬟ Aptos
const finalizedTransaction = Aptos.finalizeTransactionSigning({
  transaction,
  rsvSignatures: rsvSignatures[0],
  publicKey: senderPublicKey,
});
5. Relaying the Signed Transaction
Now that we have a signed transaction, we can relay it to the target network using broadcastTx.
[tab] Ξ EVM
const transactionHash = await Evm.broadcastTx(signedTransaction);
[tab] ₿ Bitcoin
const transactionHash = await Bitcoin.broadcastTx(signedTransaction);
[tab] ◎ Solana
const transactionHash = await Solana.broadcastTx(signedTransaction);
[tab] ◉ XRP
const transactionHash = await Xrp.broadcastTx(signedTransaction);
[tab] ◈ SUI
const transactionHash = await Sui.broadcastTx(signedTransaction);
[tab] ⬟ Aptos
const transactionHash = await Aptos.broadcastTx(signedTransaction);
The method returns a transaction hash which can be used to locate the transaction on an explorer.
[!NOTE]
⭐️ For a deep dive into the concepts of Chain Signatures, see What are Chain Signatures?
⭐️ For a complete example of a NEAR account using chain signatures in a frontend, see our web app example.