

Run Your Own Localnet
Learn how to run a localnet on NEAR.
Now that we understand what a localnet is, let's walk through the complete workflow of running it and testing it with a simple smart contract and a frontend application.
For this tutorial, we'll use near-sandbox, since it's the easiest and fastest option to start with. Our goal for this tutorial is to set up a local network, create a wallet account on it, deploy a contract, and finally run the Hello NEAR frontend that interacts with this contract directly through the local blockchain.
[!TIP]
Also check the localnet tutorial by the NEAR MPC team
Prerequisites
Before we begin, make sure you have a few essential tools installed.
- NEAR CLI - the CLI for interacting with the NEAR blockchain;
- cargo-near - the CLI that simplifies building/deploying Rust smart contracts.
Walkthrough
Step 1. Setup and boot up sandbox node
First, run the following command:
npx near-sandbox --home /tmp/near-sandbox init
This command prepares a fresh configuration inside the home folder, which is /tmp/near-sandbox in the command above. Once it's finished, you'll find several files created in that directory:
config.json- main node configuration, defining network ports, storage paths, runtime settings, etcgenesis.json- defines the initial blockchain state, including default accountnearand the validator account (by default, it'stest.near)validator_key.json- validator's keypair used to produce blocksnode_key.json- keypair used for signing network packets
This initialization process is a one-time setup. Once the configuration is in place, you can start and stop the node as many times as you like, the blockchain state will persist inside this folder.
After initialization, start the node:
npx near-sandbox --home /tmp/near-sandbox run
The node will boot up and begin producing blocks locally.
[!NOTE]
If the node fails to start with
IO error: While lock file: .../data/LOCK: Resource temporarily unavailable, it means another sandbox process was previously running and left a stale lock. Kill any running sandbox processes and remove the lock file:pkill -f near-sandbox || true rm -f /tmp/near-sandbox/data/LOCKThen run the
npx near-sandbox ... runcommand again.
[!TIP]
To confirm that your node is actually running, you can query its
statusRPC endpoint with the following commandcurl http://127.0.0.1:3030/status.
Step 2. Import test.near account
In this step, we'll import the default test.near account that was created during near-sandbox initialization. We'll need this account later to deploy our smart contract, so let's prepare it now.
First, make sure your near-cli-rs knows how to connect to your local network. If you already have a localnet configuration, you can skip this step. Otherwise, you have two options:
[tab] Interactive CLI
near config add-connection --network-name localnet --connection-name localnet-sandbox --rpc-url http://localhost:3030/ --wallet-url http://localhost/ --explorer-transaction-url http://localhost/The CLI will ask 8 questions. Answer as follows for a basic localnet setup:
Question Answer Do you want to input an API key? No, the RPC endpoint does not require API key Is there a "linkdrop" program on this network? I dont know Do you want to enter the NEAR Social DB contract account ID? No Do you want to enter the faucet URL? No Do you want to enter the meta transaction relayer URL? No Do you want to enter the fastnear API url? No Do you want to enter the staking pools factory account ID? No Do you want to enter the coingecko API url? No
[tab] Edit config.toml directly
Open your
near-cliconfig file (located at~/.config/near-cli/config.tomlon Linux,~/Library/Application Support/near-cli/config.tomlon macOS) and append the following block:[network_connection.localnet-sandbox] network_name = "localnet" rpc_url = "http://localhost:3030/" wallet_url = "http://localhost/" explorer_transaction_url = "http://localhost/"This is equivalent to running the CLI command above and is useful in non-interactive environments (CI, scripts, containers).
[!NOTE]
The
wallet_urlandexplorer_transaction_urlare set to placeholder values since no local wallet or explorer is running. For a full description of all available connection fields and when each one is needed, see the Localnet configuration values section in the CLI reference.
[!TIP]
To confirm that the connection was set up correctly, you can view information about the
test.nearaccount with the following commandnear account view-account-summary test.near network-config localnet-sandbox now.
When you initialized the near-sandbox, it created a file named validator_key.json inside the home directory. This file contains the secret key for the test.near account, which we'll need to import into near-cli-rs.
To view the key, run:
cat /tmp/near-sandbox/validator_key.json
You'll see output similar to this:
{
  "account_id": "test.near",
  "public_key": "ed25519:...",
  "secret_key": "ed25519:..."
}
Copy the secret_key value and import it into near-cli-rs by running the following command (replace <SECRET_KEY> with the actual key):
near account import-account using-private-key <SECRET_KEY> network-config localnet-sandbox
When you run the command above, you'll be prompted to enter the account ID. Type test.near and press Enter. You'll then be asked to choose a keychain for storing the credentials, select Legacy Keychain, as it stores the keys directly in the file system, which is the simplest and the most convenient option for localnet.
Step 3. Deploy the smart contract
In this step, we'll deploy a simple Hello World smart contract to our localnet.
Before deploying, we need to create an account to which a contract will be deployed. Since we've already imported the test.near account, we can use it as the parent account to create a new subaccount:
near account create-account fund-myself hello-world.test.near '10 NEAR' autogenerate-new-keypair save-to-legacy-keychain sign-as test.near network-config localnet-sandbox sign-with-legacy-keychain send
This command creates a new account named hello-world.test.near with an initial balance of 10 NEAR.
Next, clone the Hello World repository and navigate to the contract directory:
git clone https://github.com/near-examples/hello-near-examples.git
cd hello-near-examples/contract-rs
Once you're inside the repository, run the following command:
cargo near deploy build-non-reproducible-wasm hello-world.test.near without-init-call network-config localnet-sandbox sign-with-legacy-keychain send
This command compiles the smart contract, optimizes the resulting .wasm file, and deploys it directly to the hello-world.test.near account on localnet.
[!TIP]
To verify that the contract was deployed successfully, call
get_greetingdirectly:near contract call-function as-read-only hello-world.test.near get_greeting json-args '{}' network-config localnet-sandbox now. If it returns"Hello", the contract is running correctly.
Step 4. Create user's wallet account
In this step, we'll create a user account inside a wallet that can connect to our localnet. This is important because frontend applications typically interact with contracts through a wallet connection. Not every NEAR wallet supports localnet connections, but for this tutorial, we'll use Intear Wallet, which is fully compatible.\
Navigate to https://wallet.intear.tech. If you don't have an account yet, create one or import any existing account. It doesn't matter which one, this step is just to get you inside the wallet interface.
Once you're in the wallet, open the Settings panel from the sidebar, then find the Developer tab. You'll see a Localnet subsection where you can add your own local network configuration. Click Add, and fill in the fields as follows: set the RPC URL to http://localhost:3030 and the Network ID to localnet. Then click Save.
If everything is configured correctly, you should see a small, green Online badge appear next to the new network indicating that it's connected. Here's how it should look like:
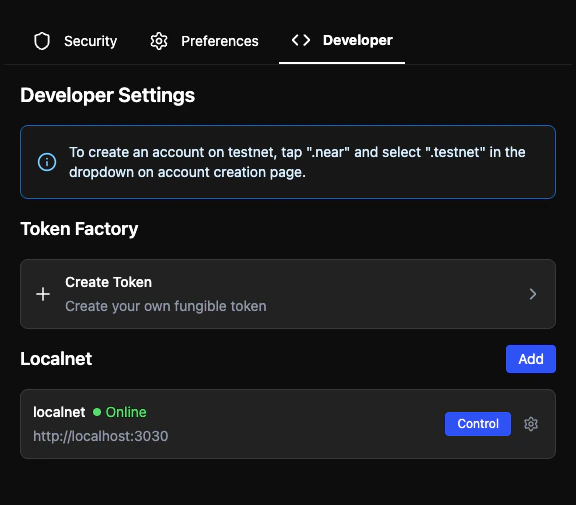
Next, click the Control button on the right side of the localnet entry. Find the Create New Account section, type a name for your new account (in our case, it's user.local) and click Create.
Once the request goes through, the new account will appear in your wallet. At this point, you have a valid account on your localnet that can sign transactions through Intear Wallet.
Step 5. Configure the Hello NEAR frontend
Use the frontend from the same Hello NEAR repository you cloned in Step 3. From hello-near-examples/contract-rs, move to the frontend directory:
cd ../frontend
Use Node.js 22.22.2 or newer and install the dependencies with pnpm:
pnpm install --frozen-lockfile
The frontend needs to know both where the contract is deployed and how to reach your node. Apply the following configuration in your local checkout.
Set the contract account
In frontend/src/config.ts, change the testnet entry in contractPerNetwork to the contract account created in Step 3, and keep NetworkId set to 'testnet':
const contractPerNetwork: ContractPerNetwork = {
  mainnet: 'hello.near-examples.near',
  testnet: 'hello-world.test.near',
};

export const NetworkId: 'mainnet' | 'testnet' = 'testnet';
export const HelloNearContract: string = contractPerNetwork[NetworkId];
[!NOTE]
NEAR Connect exposes
mainnetandtestnetnetwork slots. In this local setup, we use itstestnetslot with a local RPC URL. The node and accounts still belong to your localnet. Intear Wallet must use the custom local network and account you created in Step 4.
Set the local RPC URL
Create .env.local in the frontend directory:
echo "NEXT_PUBLIC_RPC_URL=http://localhost:3030" > .env.local
In frontend/src/providers/near-provider.tsx, replace the existing connectorOptions declaration with the following:
const localRpcUrl = process.env.NEXT_PUBLIC_RPC_URL || 'http://localhost:3030';

const connectorOptions: NearConnectorOptions = {
  network: NetworkId,
  providers: {
    testnet: [localRpcUrl],
  },
};
The existing FailoverRpcProvider and function-call-key plugin both use connector.providers, so they will use the same local RPC endpoint. Keep their existing setup. The .env.local value takes effect because the declaration above reads it; restart the development server after changing it.
Connect and update the greeting
Start the frontend:
pnpm dev
Open http://localhost:3000/hello-near. The page should read the greeting from hello-world.test.near on your local node before you connect a wallet. If the read fails, confirm that the Sandbox is running at the configured RPC URL and that the contract account matches Step 3.
Click Login and select Intear Wallet, Web version. In the wallet, select user.local on the custom localnet you configured in Step 4. If the frontend already has a wallet connection from an earlier testnet session, log out and reconnect with the local account.
Approve the connection and any request to add a function-call key for set_greeting on hello-world.test.near. The frontend's existing plugin uses this key to sign greeting updates locally, so later updates may not open a wallet approval screen.
Enter a new greeting and click Save. The updated greeting should appear in the frontend. You can confirm that it was stored on your local node with the CLI:
near contract call-function as-read-only hello-world.test.near get_greeting \
  json-args '{}' network-config localnet-sandbox now
Step 6. (Optional) Stream blocks with NEAR Indexer
So far our localnet has been producing blocks silently. In this step, we'll attach the NEAR Indexer to the same localnet so we can observe every block, transaction, and receipt in real time, which is useful for building back-ends, analytics, or end-to-end tests that react to on-chain events.
The indexer is essentially a neard node with extra streaming features, so we can point it at the same home directory the sandbox is already using (/tmp/near-sandbox). That way it joins our localnet as the node itself, reusing genesis.json, validator_key.json, node_key.json and config.json, no extra network setup required.
[!CAUTION]
The NEAR Indexer Framework only works on
Linux x86, it does not support Windows or MacOS. If you are on another platform, skip this step or run the indexer inside a Linux x86 container/VM that can reach the sandbox home directory.
First, stop the running sandbox node with Ctrl+C. Two processes can't share the same home directory, so the indexer will take its place as the localnet node.
Next, clone nearcore and build the indexer example:
git clone https://github.com/near/nearcore.git
cd nearcore/tools/indexer/example
cargo build --release
Then start the indexer pointing at the sandbox home directory:
cargo run --release -- --home-dir /tmp/near-sandbox run
The indexer will boot up using the existing localnet state and begin streaming finalized blocks to its handler. You'll see block data printed to stdout as new blocks are produced.
[!TIP]
With the indexer running, open a new terminal and trigger a transaction against your contract (for example, calling
set_greetingfrom the frontend or fromnear-cli-rs). The corresponding block, transaction, and receipts will appear in the indexer's output almost immediately.
To learn how to parse the streamed block data, filter by accounts or shards, and tweak sync/finality settings, head over to the full Creating an Indexer tutorial.
You've now gone through the entire process of setting up a local NEAR environment — from running the Sandbox and deploying a contract to connecting a wallet, interacting with it through a frontend, and streaming on-chain events with the NEAR Indexer. With this setup, you can experiment freely, test your contracts safely, and build end-to-end decentralized applications without touching mainnet or testnet.